Monday, May 16, 2011
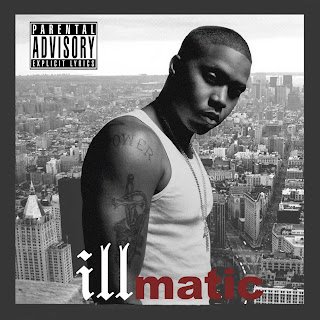
Front of CD
The magazine was a poster project. In this project, we had to recreate/ make up a CD with our own twist from scratch. We only had the help of a template, and we had to put on 5 pictures, not including barcodes, parental advisory, etc... We also had to include at least 10 songs and put on at least 2 filters out of the 5 photos.
Magazine
The Magazine was a poster project. In this project, we had to recreate a magazine from scratch. The only catch is that we had to use our own photos on the actual magazine. We had to find the text of the actual magazine, because we were not able to use picture titles. We had to place things and find texts to make it look like what an actual magazine would look like.
Tuesday, April 12, 2011
Flawless Skin
This project was a photo repair. The objective of the project was to take the picture of the girl, and give her flawless skin, while adding makeup. In this project, we used the patch tool to get rid of the glare on her forehead, and the healing tool to get rid of all of her blemishes. Then, we blurred her face to make it look smoother, using the gaussian blur tool. Using the eraser we erased parts of the blurs to get the details back. To add makeup, we used hue/ saturation, plus the brush tool, to add makeup where we felt was needed.
Friday, April 8, 2011
Dear Old Grandfather was a photo repair project. The objective of the photo was to touch up the dust from the photo, get rid of the creases, brighten the photo, and to hand color the photo. In this project, we used the clone stamping tool to get rid of the dust/ creases, curves to show the display the lights and darks better, and we used the brush tool, to hand color everything (using hue/saturation).
Thursday, March 31, 2011
Dear Old Grandfather
Dear Old Grandfather was a photo repair project. In the "Dear Old Grandfather", we took out all of the scratches by using the dust and scratches tool, in filter, making the white spots darker and the dark spots lighter. Then we took out the creases that went through the middle of the picture using the clone stamp tool. Next we had to recreate the roof, where the crease went through using the clone stamp tool. We also changed the curves, which is like a more sensitive levels, to make the picture brighter.
Handsome Guy 2
Handsome Guy 2 was a photo repair project. In this version of the Handsome Guy, we made mainly took out the wrinkles of the guy and made him look younger. We pretty much did the same thing in the last assignment, but we turned his eyes green and his lips pink. We changed it by using the hue and saturation.
Friday, March 25, 2011
Handsome Guy
Handsome guy is a photo repair project. In this photo, we photoshopped the "handsome man" to look younger and less tired. We were able to do this, by making his wrinkles look less deep, change the eye color, and brighten his teeth. We used the cloning stamp tool to smooth out his wrinkles and then changed the opacity to make it seem less. Next we quickmassed his teeth, and then made them whiter by using the dodge tool. Lastly, we changed his eye color, by using apple u. We changed the hues and saturation of the color, and made his eyes pop.
Thursday, March 24, 2011
Rappelling
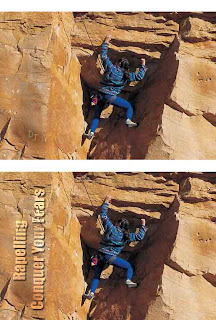
The rappelling project was a photo repair project. In the rappelling project, we learned how to manipulate the history pallet. We took a snapshot of the original photo, and then we duplicated the picture, moving it to the bottom, we were able to create a contrast of the difference of the before picture and the after picture "dbl up". After that we took a snap shot of both pictures. Then we took out the holes in the wall and the tag. We labeled that pallet as "no holes". Then we took that picture and used the text masking tool, and moved it vertically. We added the text to the tool, and took the history brush, and added the holes back to the right side of the picture.
Crew
The Crews Photo was a photo repair project. In crew, we took a picture that was ripped on the left corner, and we duplicated it. One was the original, while the other one was the one we fixed up. In this project, we got rid of the rip and filled it in with the cloning stamp. We also got rid of the wave and the boat in the top right corner. To get rid of half the wave, we tried out the patching tool, and for the other half including the boat we used the cloning stamp tool. Lastly, we added the word crew using the horizontal masking type tool, we added levels to make it contrast the water, and make it visible. Lastly we added a layer to the type.
Tuesday, March 22, 2011
Bat Boy Newspaper
Batboy the Musical Newspaper, was a poster project. In this project, we had to create a newspaper for an upcoming play at El Camino, called Bat Boy: The Musical. We had to incorporate a sense of El Camino into the newspaper, while still adding information about the actual play. In the main picture, we had to take a picture of Bat Boy and put him into a photo that we took at our school. We also had to make up an extreme photo to place as a second story to make the newspaper seem more realistic and different from everyone else's.
Tuesday, March 1, 2011
Thespian Project
In the Thespian project, we were suppose to take photos of ourselves doing different activities in order to create a sense of different personalities. We learned how to resize images, how to move images to the desired places, how to change background colors, and how to use the text tool.
Zoo Project
The focus of this project was to take several pictures of animals and to put them on a postcard to promote a zoo. In this project we learned several resizing techniques, how to add a background border, and how to use the text tool. In order to resize, we had to changed the resolution, and added the desired length/ width needed on the rough. To add a background border we went to canvas size, and added the desired amount on the rough.
Commodities Project
In the commodities project we selected items that are necessary for everyday living. We selected various items and took them from their original backgrounds using various photoshop items i.e. masking tool and quick mass. We then put them on a postcard, in which we learned how to make sqaures and change the background colors of each.
Annual Cover Project
In this project, we learned how to create an annual cover. We learned how to take things and blend them in, by using the gradient tool. We also learned how to take the type from another picture by using the masking tool.
Subscribe to:
Comments (Atom)


